The default WooCommerce product page is fine – just fine. It gets the job done, lays out the essentials, and doesn’t actively offend anyone. But fine doesn’t sell. Fine doesn’t differentiate your brand. Fine doesn’t keep people on your site.
Customizing your WooCommerce product page is one of the best ways of optimizing the experience so people actually want to buy.
Think about it: Every successful online store has a product page designed to guide customers toward a purchase. Maybe that means better product descriptions, a sleeker layout, trust signals in the right places, or custom fields that answer questions before they’re even asked.
WooCommerce gives you the framework, but the real magic happens when you make it your own.
We’re going to break down how to modify your WooCommerce product page without breaking your site. Because if your store looks like it was built ten years ago, people are going to treat it like it was built ten years ago. Let’s fix that!
Native options to modify the WooCommerce product page template
WooCommerce includes built-in tools for modifying your product page. The primary tool is WooCommerce blocks. You can access these blocks through the WordPress Site Editor.
They work the same way as other blocks, and you can actually access them through the block editor for posts and pages, but going through the Site Editor lets you target product pages. Here’s how:
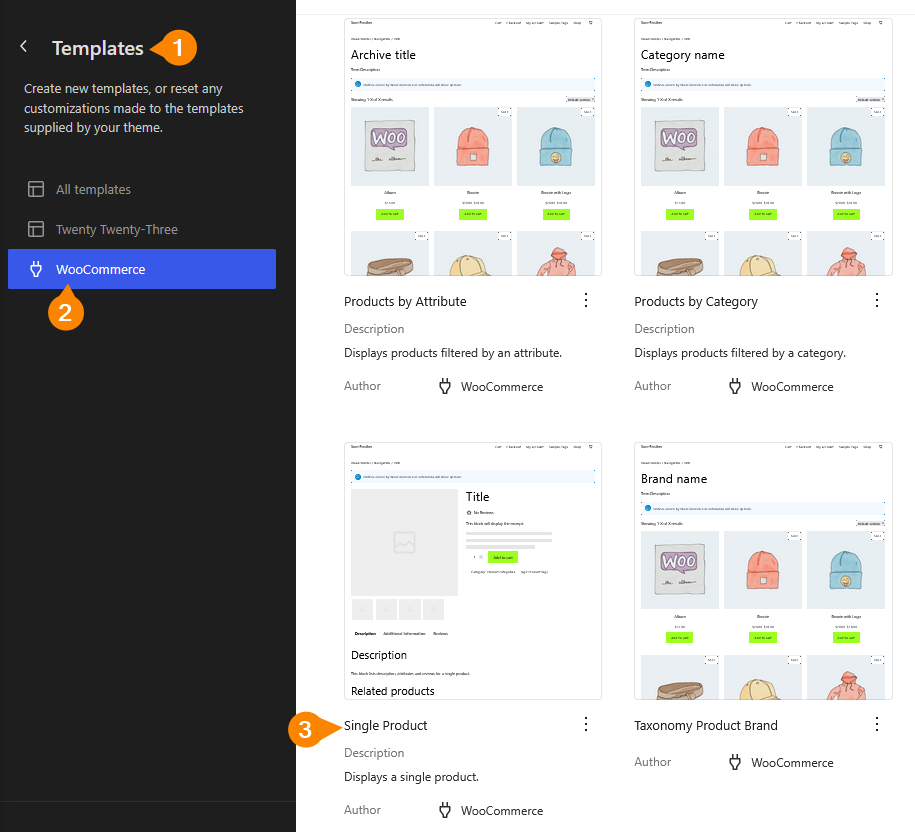
- From your admin dashboard, go to Appearance > Editor.
- Click on Templates > WooCommerce, then find the Single Product template, which is usually at the bottom of the list.
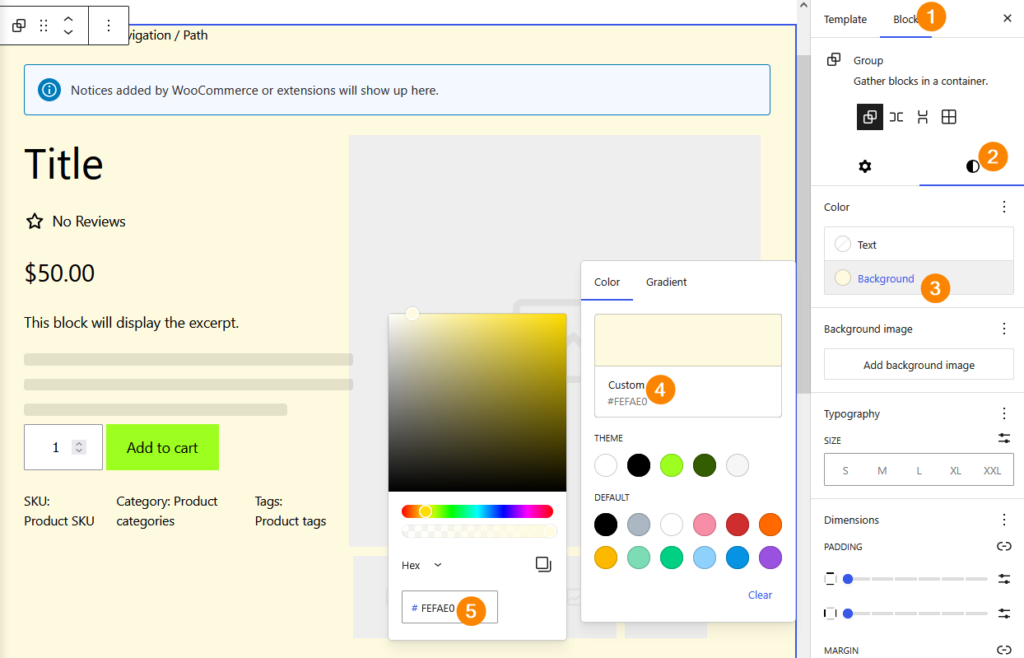
- This will open the block editor you’re already familiar with, where you can move elements around as usual. We’re going to start by selecting the block with the title and other product details and moving it left so it switches spots with the image block.
- Next, we’ll change the page’s background color. Select the top-most container then, from the menu on the right of the page, go to Block > Styles and click on Background. Enter your preferred color.
- Next, we’re going to edit the font. From Block > Styles, scroll to the Typography section, click the three dots next to it, and select Font. Choose a different font, like IBM Plex Mono, and change the size to L for large.
- Scroll back up a bit to the Color section, click on Text, and give your text a different color.
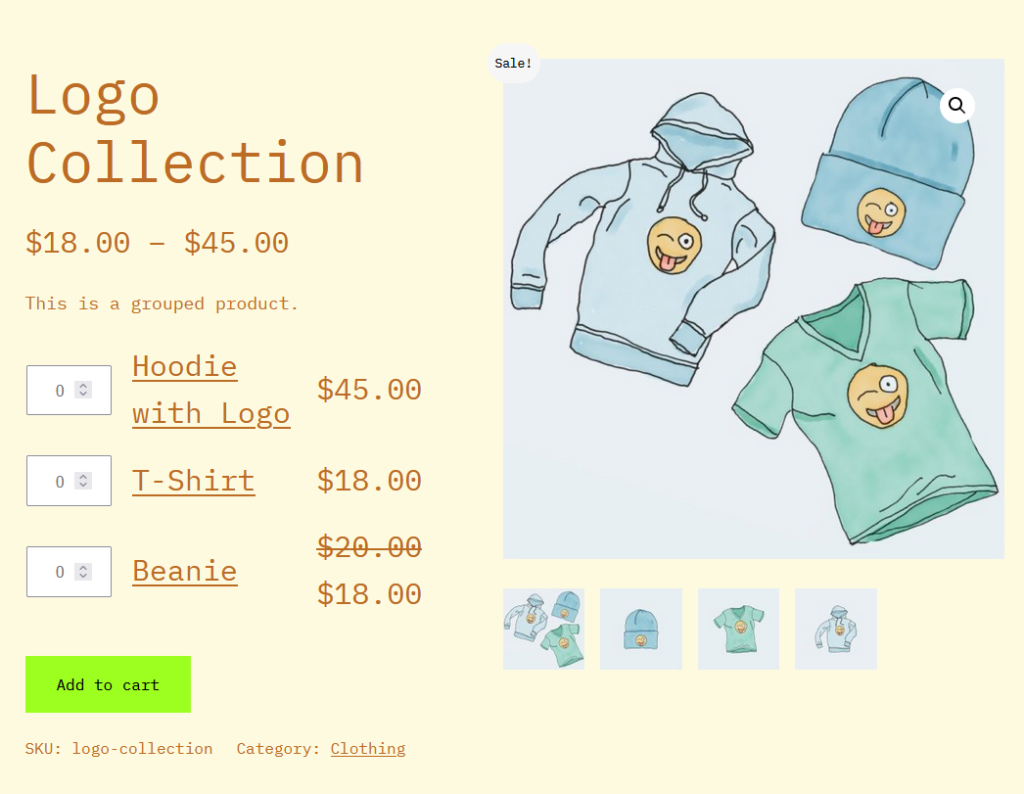
- Save the changes and visit the store to view a single product, where you should see your changes live.
Customize your WooCommerce product pages using plugins and page builders
The native customization tools are powerful enough on their own, but sometimes you need a little bit more juice. Luckily, there’s no shortage of third-party solutions catering to these needs.
From simple plugins to full-fledged page builders, here are some tools that will help you build WooCommerce product pages that stand out.
1. StoreCustomizer
StoreCustomizer is a WordPress plugin that modifies WooCommerce store layouts without requiring any code. Formerly called WooCustomizer, it works within the WordPress Customizer instead of forcing you into theme file edits or clunky page builders.

Key capabilities:
- Remove, rearrange, or tweak product page elements like tabs, pricing, descriptions, and buttons.
- Change the Add to Cart button’s text, reposition it, or adjust how images and meta details display.
- Control spacing, visibility, and typography settings independently of your theme’s defaults.
- Add functional improvements like AJAX search, product sales stats for admins, and better navigation.
Primary use case: StoreCustomizer is ideal for store owners who want layout and functionality control through a familiar visual interface. Because it doesn’t modify core files, WooCommerce updates won’t undo your changes.
2. Customizer for WooCommerce
Customizer for WooCommerce is a plugin that simplifies text and label editing across your store without requiring PHP or template modifications. WooCommerce has built-in filters for changing button text, labels, and other elements, but using them traditionally means writing custom code. This plugin replaces that process with a straightforward settings page.
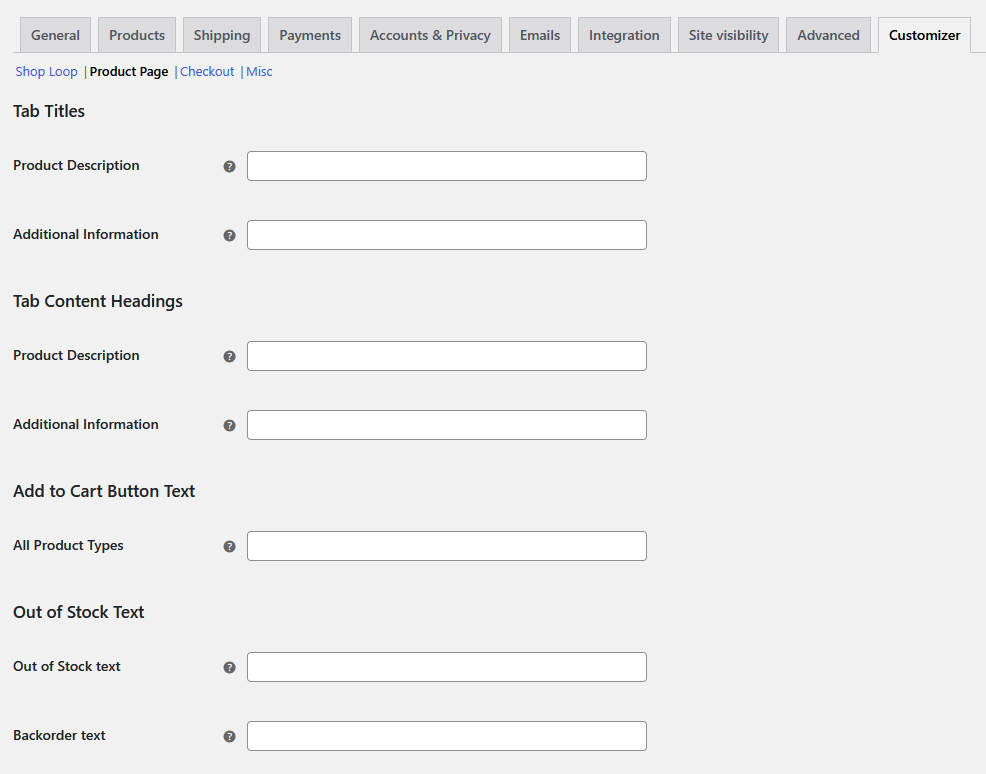
Key capabilities:
- Edit the Add to Cart button text for different product types and locations.
- Rename the Product Description and Additional Information tabs.
- Modify checkout labels like coupon prompts, login prompts, and the Submit Order button text.
- Adjust sales badge text, product-per-page counts, and the default state of the Create Account checkbox.
- Customize tax labels and placeholder images.
Primary use case: Customizer for WooCommerce is ideal for quick A/B testing of text changes. It lets store owners refine their messaging and test results instantly without risking site stability.
3. Elementor
Elementor is a WordPress page builder that replaces the default editor with a fully visual, drag-and-drop interface. It integrates with almost any WordPress theme, allowing you to design pages in real time without writing PHP, CSS, or shortcodes.
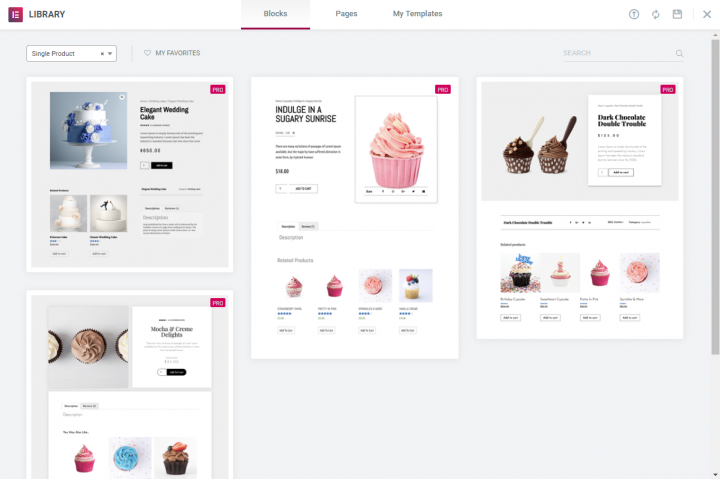
Key capabilities:
- Design custom WooCommerce product pages from scratch using a drag-and-drop editor.
- Control every product page element — images, pricing, descriptions, the Add to Cart button, stock availability, and meta details.
- Move, resize, or add custom widgets like testimonials, countdown timers, and upsell sections.
- Create dynamic product page templates that apply to all products, or customize individual pages as needed.
- Set conditional display rules to show different layouts based on product categories or tags.
Primary use case: Elementor is ideal for store owners who want full visual design freedom over their product pages. Instead of relying on a theme’s default product layout, you can build exactly the page you want without touching any code.
4. Divi
Divi is a theme and full-featured visual builder combo that gives you complete design control without coding. Unlike traditional themes that lock you into preset layouts, its drag-and-drop interface allows for real-time customization of every page element.
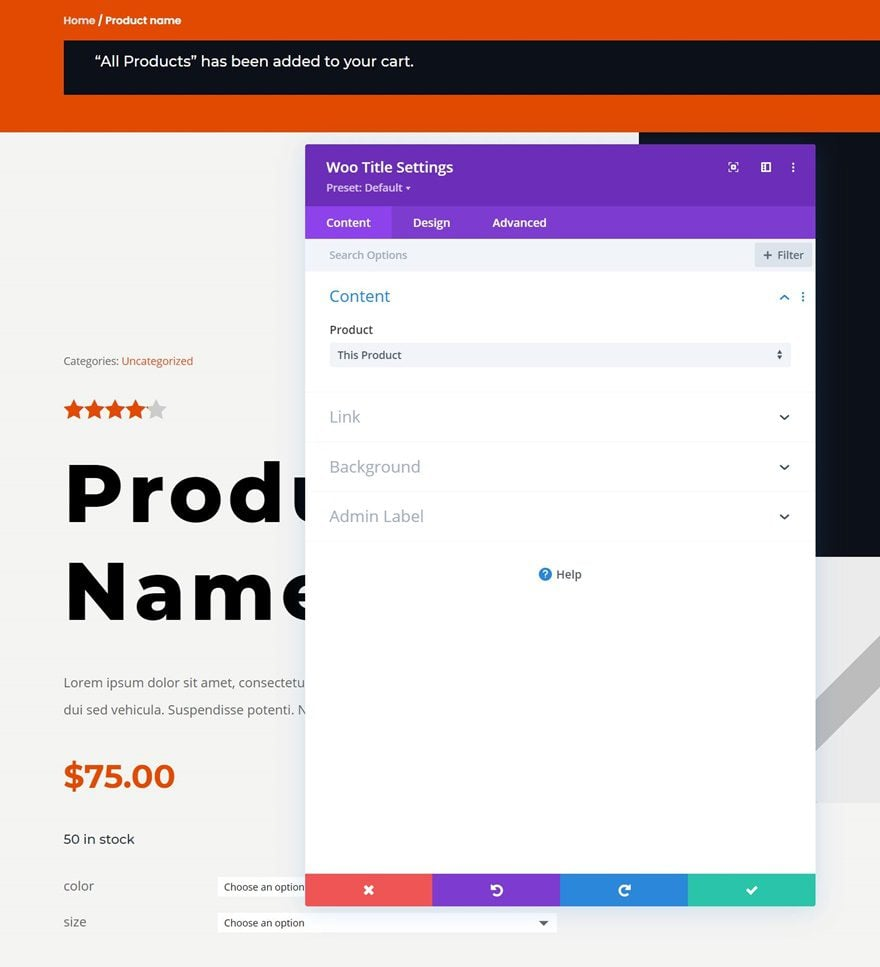
Key capabilities:
- Design custom WooCommerce product pages using the Divi Theme Builder’s visual editor.
- Style every product page element independently — images, pricing, descriptions, stock levels, Add to Cart buttons, and reviews.
- Move, resize, or restyle elements to match your branding exactly.
- Add conversion-focused modules like related products, upsells, and custom call-to-action sections.
- Create dynamic templates that apply across all products, or tailor layouts for specific categories.
Primary use case: Divi is ideal for store owners who want a single tool that handles both theme design and product page customization. It removes the rigid structure of standard WooCommerce product pages, making it easy to adjust elements based on your store’s needs.
Simple CSS changes to transform your product page design
Sometimes, you need a little bit more coding control than you get from either the built-in tools or third-party solutions. That’s where custom CSS comes in.
CSS is a styling language that controls the visual appearance of your web pages. It can modify elements like product titles, prices, buttons, images, and layouts. WooCommerce applies predefined styles based on your theme, but CSS lets you override those settings without altering core files.
Here’s what you can adjust with custom CSS:
- Typography settings like font size, color, and weight.
- Button styles, including background colors and hover effects.
- Image sizing and positioning.
- Spacing between page elements.
- Product tab appearance, borders, and shadows.
- Hidden or visible sections on the page.
For more advanced layout restructuring, CSS techniques like Flexbox or Grid help you build responsive, visually polished designs.
You can add custom CSS through one of three ways:
- The WordPress Customizer, available via Appearance > Customize > Additional CSS.
- A child theme via its style.css file.
- A custom code plugin like Code Snippets.
Beginner-friendly CSS snippets with safety tips
Here are some CSS snippets you can use to customize your WooCommerce product pages:
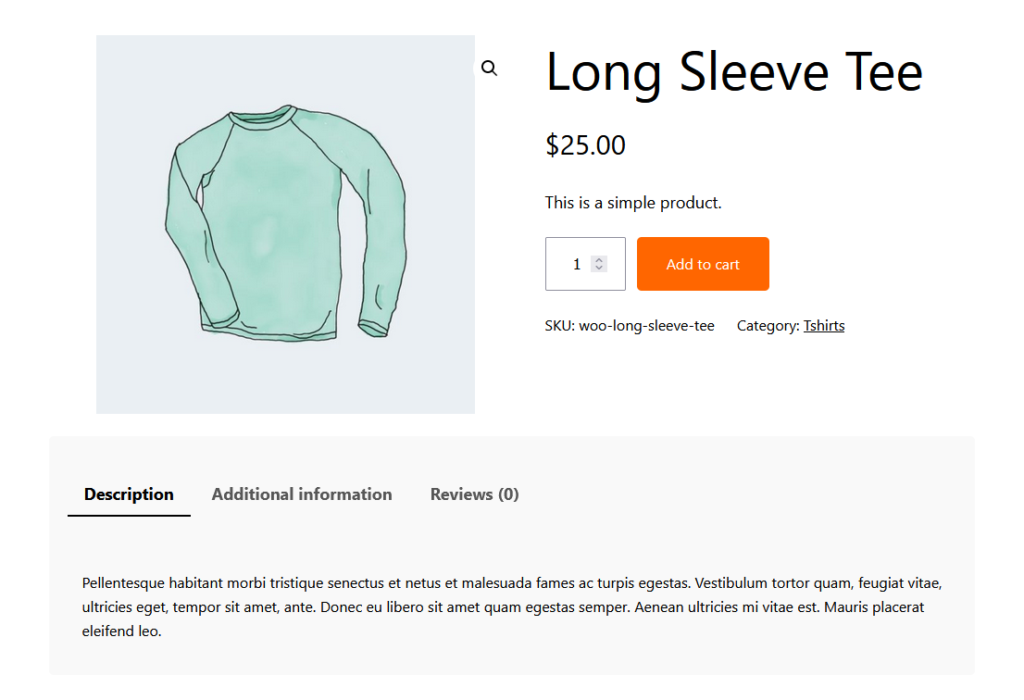
- Product title:
Product_title {font-size: 28px; /* Adjust size */color: #333333; /* Change color */font-weight: bold; /* Make it bold */text-align: center; /* Center align */}Price:.price {font-size: 22px;color: #e74c3c; /* Red price color */font-weight: bold;}
- Add to Cart button:
single_add_to_cart_button {background-color: #ff6600; /* Change button color */color: white; /* Text color */font-size: 16px;padding: 12px 20px;border-radius: 5px; /* Rounded edges */border: none;transition: background-color 0.3s ease;}.single_add_to_cart_button:hover {background-color: #cc5500; /* Darker shade on hover */}
- Product image size:
.woocommerce-product-gallery img {max-width: 80%; /* Reduce image width */display: block;margin: 0 auto; /* Center image */}
- Product tabs:
.woocommerce-tabs {background-color: #f9f9f9; /* Light gray background */padding: 20px;border-radius: 5px; /* Rounded corners */}.woocommerce-tabs ul.tabs li {background-color: #ddd; /* Tab background */color: #333;padding: 10px 15px;border-radius: 3px;cursor: pointer;}.woocommerce-tabs ul.tabs li.active {background-color: #ff6600; /* Highlight active tab */color: white;}
Here’s what these snippets give you:
Whenever you’re tweaking your WooCommerce store with custom CSS, keep the following safety tips in mind:
- Test all changes on mobile devices or use your browser’s responsive tools to confirm everything displays correctly.
- Use CSS specificity instead of !important to prevent conflicts with other styles.
- Clear your browser and site cache if your changes don’t appear right away.
Advanced modifications with PHP and hooks
PHP hooks are the WordPress mechanism for making functional changes to your product pages. CSS handles how things look, but hooks control how things behave. You can implement them by adding PHP to your child theme’s functions.php file.
Here are some things you can do:
- Change the Add to Cart button text:
function custom_add_to_cart_text($text) {return __('Buy Now', 'woocommerce'); // Change to desired text}add_filter('woocommerce_product_single_add_to_cart_text', 'custom_add_to_cart_text'); // Single productadd_filter('woocommerce_product_add_to_cart_text', 'custom_add_to_cart_text'); // Shop/Archive
- Remove product tabs:
function remove_woocommerce_product_tabs($tabs) {unset($tabs['description']); // Remove Description tabunset($tabs['additional_information']); // Remove Additional Information tabunset($tabs['reviews']); // Remove Reviews tabreturn $tabs;}add_filter('woocommerce_product_tabs', 'remove_woocommerce_product_tabs');Add custom text below the product price:function custom_text_under_price() {echo '<p style="color: red; font-weight: bold;">Free shipping on orders over $50!</p>';}add_action('woocommerce_single_product_summary', 'custom_text_under_price', 15);
- Remove the related products section:
remove_action('woocommerce_after_single_product_summary', 'woocommerce_output_related_products', 20);Customize the out of stock message:function custom_out_of_stock_message($text, $product) {if (!$product->is_in_stock()) {return '<strong>Sold Out!</strong> Check back soon or contact us for availability.';}return $text;}add_filter('woocommerce_get_availability_text', 'custom_out_of_stock_message', 10, 2);
Put all these together and here’s what you get:

Creating custom templates for unique designs
WooCommerce template files control the HTML structure of your product pages. They are located in the /woocommerce/templates/ directory. To modify them safely, copy the relevant template into your child theme‘s /woocommerce/ folder and edit it there.
The key template for product pages is single-product.php, which calls other templates like:
- content-single-product.php, which controls the product structure
- product-image.php, which handles product images
- price.php, which displays pricing information
- add-to-cart.php, which manages the Add to Cart button
To modify the layout, edit single-product.php and rearrange actions hooked into woocommerce_single_product_summary. You can remove or add elements like descriptions, tabs, and related products using remove_action() and add_action().
Should you edit WooCommerce template files directly?
Yes, you can edit WooCommerce template files, but only if you do it correctly. Editing templates gives you the deepest level of control over your product page structure. No plugin or page builder can match the precision of working directly with the template code.
That said, template editing carries real risks if handled carelessly. Here’s how to approach it safely:
When template editing makes sense:
- You need structural changes that CSS, hooks, or page builders can’t achieve.
- Your product page requires a completely unique HTML layout that no plugin supports.
- You have developer experience or access to a qualified WordPress developer.
When you should use a different method instead:
- You only need visual style changes. CSS is a better fit.
- You want to add or remove specific features. PHP hooks handle this without touching templates.
- You’re not comfortable working with PHP files. A page builder like Elementor or Divi offers a safer, visual alternative.
Safety rules for template editing:
- Always use a child theme. Editing templates in your parent theme means a single theme update will overwrite all your changes.
- Use a staging site for all testing. Never edit templates on your live store.
- Rely on WooCommerce hooks (remove_action() and add_action()) instead of hardcoding changes. This keeps your modifications modular and easier to maintain.
- Keep a backup of the original template file before making any edits.
Template editing is a powerful option when the situation calls for it. But for most stores, the methods covered earlier in this guide, such as plugins, page builders, CSS, and PHP hooks, will handle the job without the added complexity.
Which customization method is right for you?
With so many options available, picking the right approach depends on what you’re trying to change and how comfortable you are with code. Here’s a quick decision framework to help you choose.
- Recommended method: Custom CSS or the WordPress Site Editor.
- When to use: You want to adjust how your product page looks without changing what it does.
- Key benefit: Both options are beginner-friendly and don’t require any plugin installations or PHP knowledge.
- Recommended method: Customizer for WooCommerce or StoreCustomizer.
- When to use: You need to change specific words or labels across your store and want to test variations quickly.
- Key benefit: These plugins let you make and preview text changes instantly through a simple settings page.
Full product page redesigns (custom layouts, new sections, visual overhauls)
- Recommended method: A page builder like Elementor or Divi.
- When to use: You want to rearrange, add, or completely redesign your product page layout without writing code.
- Key benefit: Drag-and-drop editors give you full visual control over every element on the page.
- Recommended method: PHP hooks added to your child theme’s functions.php file.
- When to use: You need to change how your product page behaves, not just how it looks.
- Key benefit: Hooks let you add or remove specific functionality without editing core WooCommerce files.
Completely unique page structures (custom HTML layouts, non-standard product page architecture)
- Recommended method: Custom WooCommerce template editing.
- When to use: No plugin, page builder, or hook can achieve the structural change you need.
- Key benefit: Direct template control gives you the deepest level of customization possible. Just be sure to use a child theme and test on a staging site first.
If you’re unsure which category your project falls into, or if it spans more than one, a professional developer can help you pick the most efficient path forward.
Get expert WooCommerce customization from vetted Codeable developers today
Customizing WooCommerce product pages can be as simple or as complex as you make it.
The WordPress Site Editor handles basic layout changes within your theme’s constraints. Plugins like StoreCustomizer and Customizer for WooCommerce offer more targeted control without touching code. Page builders like Elementor and Divi go further, giving you a visual interface to fully redesign product pages.
But for the deepest level of control, custom templates and CSS/PHP modifications let you build exactly what you need — if you know how to do it without breaking your site.
Some of these methods will get you close to what you want, but real, store-specific customization takes experience. That’s where working with a dedicated WooCommerce expert makes all the difference.
Codeable’s vetted WooCommerce developers can handle everything from minor CSS tweaks to full-scale custom product page templates, ensuring everything works smoothly and efficiently. Instead of spending hours troubleshooting broken layouts or clashing plugins, you can have a developer build exactly what you need — and build it right the first time.
Here’s what working with Codeable looks like:
- One-off projects: Need a specific customization done? Submit your project and receive a fixed-price estimate from a pre-vetted WooCommerce expert. All work is backed by a 28-day bug-fix warranty and a secure escrow system that holds payment until you’re satisfied.
- WooCommerce packages: For common product page modifications — like custom checkout flows, layout redesigns, or plugin configurations — Codeable offers structured WooCommerce development packages that bundle the work into a clear scope and price.
- Consultation: Not sure which customization approach is right for your store? Codeable’s strategic consultation service pairs you with an experienced developer who can assess your current setup, recommend the best path forward, and map out a plan before any code gets written.
- Retainer partnerships: If your store needs continuous optimization — regular A/B testing, seasonal layout updates, ongoing performance tuning — a retainer arrangement gives you a dedicated developer on a weekly, monthly, quarterly, or yearly billing cycle. Think of it as having your own WooCommerce specialist on call.
- Maintenance packages: WooCommerce updates, plugin patches, and security monitoring don’t stop after launch. Codeable’s ongoing maintenance services keep your product pages running smoothly long after the initial build is done.
If you’re serious about getting your WooCommerce store to look and perform the way you want, skip the trial and error.
Post your project on Codeabletoday and get a no-obligation, fixed-price estimate from a vetted WooCommerce expert.
FAQ
Can I edit the actual template files for my WooCommerce pages? Is that a good idea?
Yes, you can edit WooCommerce template files. Template editing means copying a file from WooCommerce’s /woocommerce/templates/ directory into your child theme’s /woocommerce/ folder and modifying the HTML structure directly.
It’s a good idea when you need structural changes that CSS, PHP hooks, or page builders can’t achieve — such as a completely custom product page layout with non-standard HTML markup.
However, there are important safety considerations. Always work within a child theme, because editing templates in your parent theme means a single update will erase your changes. Test all modifications on a staging site before pushing them live. And wherever possible, use WooCommerce hooks (remove_action() and add_action()) instead of hardcoding changes into the template, as this keeps your code modular and easier to maintain.
For most product page customizations — visual styling, text changes, adding or removing features, or full layout redesigns — other methods covered in this guide (CSS, plugins, page builders, or PHP hooks) are simpler and carry less risk. Reserve template editing for situations where no other approach can deliver the result you need.

20 000+ businesses of every shape and size have already trusted us to hire WordPress developers and scale their growth.
 Dream It